| Last Update: July 1, 2011 |
| History of the OPR - East Portland Branch - Molalla Branch - Videos of the OPR in Action News & Upcoming Events - Photos of Past Events - Roster of the OPR Special Features |
| History of the OPR - East Portland Branch - Molalla Branch - Videos of the OPR in Action News & Upcoming Events - Photos of Past Events - Roster of the OPR Special Features |
| Copyright © 2004-2011 All Rights Reserved |
| Restoring a Dressel Switch Lamp to OEM Function The project is a Dressel Electric Switch Lamp. The deadline was July 4, 2011, one week from the date of obtaining the lamp. The goal was to get the lamp restored and ready in time to be installed on the OPR's Oaks Park Siding switch in time for the OPR speeder event, which will involve several night runs. The July 4th event is more of a test of the switch lamp function, with the ultimate goal of the lamp being featured and used during the Holiday Express event later this year, along with a newly restored lamp belonging to Chris McLarney. The lamp is a Dressel Electric Switch Lamp, purchased used on Ebay for almost nothing. But all the parts were there and the lamp had minimal to no rust. However, it showed its age and needed a full strip down, repaint and rewire job. What makes this switch lamp so nice is that instead of being an oil switch lamp that was converted for electrical use, it appeared to be designed specifically by Dressel to be an electrical lamp. An early style possibly dating from the 1930s. That includes a pretty nice light bulb mechanism whereas the bulb is suspended on a spring suspension system, likely devised to protect the bulb element from the sudden jolts of turning the switch. The original light was most likely a 10 volt RR signal bulb, however, 12 volt car bulbs may have also been used. The base of the Dressel unit is a BA15 bayonet base, which is exactly the same light bulb base as the average tail light bulb in a car. Bulb No. 1156 or compatible bulbs will fit just fine. The plan was to rebuild the lamp to work as it was originally intended and it was wired to operate a 12 volt bulb from a small car style battery at the base of the switch. When not in actual railroad use, the lamp lives in my office. About the Dressel Switch Lamp Unfortunately, I know very little about this particular switch lamp. So stay tuned until I can gather more information. The lenses are dated 1935, but I do not believe that's the date of manufacture, but rather the date of design as that seems to be a common date among switch lantern lenses. If I had to guess, I would assume the lamp is probably from the 1940s. The lamp came from Bremen, Indiana, but there's no indication what railroad might have used it. If anyone can enlighten me as to the model, approximate age or any other information on this lamp, please email me anytime. |
| Railroad Hardware Restoration Project Series |

| Dressel Electric Switch Lamp |
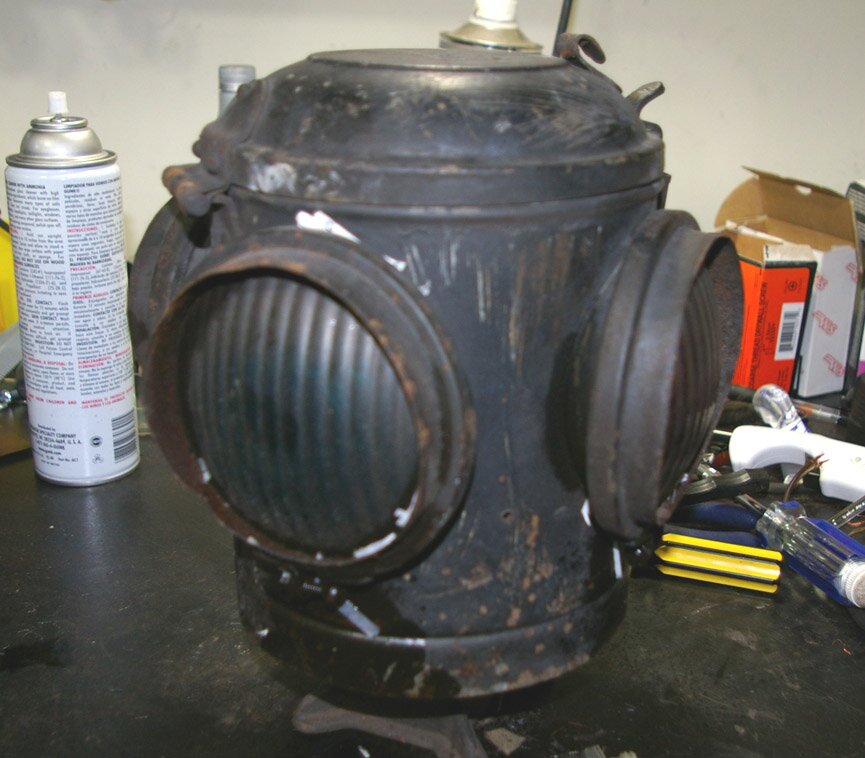


| The exterior of the lamp as I got it. Not too much rust or corrosion. In very restorable shape. |
| The interior of the lamp as I got it. Fortunately all of the original electrical parts were still there. Often times these lamps are converted over to 120 volt AC power, including a standard home light socket. I wanted to retain and restore the original electrical equipment, especially since I plan on using a low voltage bulb. The original lamp mechanism is very interesting in how it protects the bulb from the sudden jarring of moving the switch around. |
| The lamp was equipped with standard 4.5" switch lenses made by Corning. Two green (aqua color) and two red lenses. At first the lenses just looked like they needed a simple cleaning. But that did nothing to remove the grim and corrosion. Next I tried buffing the lenses and that barely made a dent. Finally, tested a lens on the benchgrinder wire brush and much to my surprise, it cleaned up great with no scratches! After wire brush, the lenses were buffed and polished to the point that they look like they are brand new! |
| To do this project right, every last bit of paint has to be removed, all rust sanded down and the entire lamp, cleaned primed and painted. Here the lamp is partly prepped with some paint removed via the bench grinder wire brush. Detail paint removal will be required via a dremel before the project can proceed. |
| Box of parts. These will also be detailed restored and repainted as needed, before being reassembled to the lamp body. |
| To be continued... |


| On the left, the base adapter was painted with a rust inhibiting paint. It will eventually be shot with the same gloss black when done. On the right, the snow hoods were the most damaged parts of the lamp, heavily rusted and pitted. I sanded as best I could and painted with primer. |
| The body of the lamp was finally stripped and cleaned. Then painted in primer both inside and out. |


| Some parts of the dressel switch lamp, including the snow hoods, restored glass, part of the light base, the switch stand adapter. The only new parts of this project are the lens gaskets and brass rings. All other original parts will be refurbished and reused. Different style lens will be tried out on the lamp later. |
| The light fixture is now completely restored. The far left picture is what it looked like originally. The fixture was completely disassembled, cleaned polished, repaired and reassembled. Every original part, including screws, nuts, springs and washers were reused, but were cleaned and polished to look like brand new. |
| The interior restoration is nearly complete. In the far left photo, there was one hole in the body that was drilled for unknown reasons. Since this lamp will be used on a real railroad and outdoors during inclement winter weather, I plugged up the hole with RTV sealant. The interior was painted with satin silver paint, which is not the original paint, but I'm hoping will look better and maybe help reflect the light better than the original black paint. The light fixture was test fitted, but won't be actually mounted until the exterior is painted and clear coated. |


| Lamp exterior was just painted in gloss black and a new power supply found for the lamp. Power supply will be a Werker deep cycle 12 volt, 35Ah battery. The light bulb is a new GE 1195BP bulb. This is 38 watt bulb at 12.5 volts, which is brighter than the other bayonet bulbs I could find in standard 12 volt. Burning at a rate of 3 amps, the battery should last roughly 11 hours per cycle. This light bulb only has a rated life 300 hours. GE part no. 27023 If I revert to a standard 27 watt 1156 bulb, the usage per charge would go up to about 17 hours. The 38 watt bulb might actually prove to be too bright for the train crew when approaching Oaks Park Station, so we'll have to see. The standard switch lamp wattage was probably even less than 27. The only time the lamp will see any regular time in the field as far as I know is during the OPR Holiday Express. It gets dark around 5pm and trains stop running by around 9pm, so it will only be needed about 4 hours per day or 16 hours per weekend. |
| A battery box for the battery was obtained and wired up. The battery is wired to a fuse and an exterior switch. A plug will connect the battery box to an intermediate wire that will be mounted on the Oaks Park Switch with plugs on both end. The battery will plug in at the bottom and the switch lamp will plug in at the top. The light will be turned on and off via the switch on the battery box. The lid of the battery box contains spare bulbs and fuses. |
| A preview of what the light will look like. The lenses throw a very focused narrow pattern designed to be able to be seen from extremely long distances, relative to the low wattage output of the bulb. The tight beam only about 4 feet away shows the focus on the Land Cruiser. The 3rd picture is looking directly into the focus portion of the lens. When looking even just slightly off to the side, the lens is only moderately bright. |
| The painting part of this project has been by far the most frustrating. After having had a nice smooth top coat of gloss black applied and waiting a day or so, I attempted to apply clear coat. But my lack of painting skills showed as the clearcoat began to immediately crack and lift. This required partly stripping the paint and applying new gloss black. When that didn't work, I stripped the entire exterior of the lamp and started from scratch. With no more gloss black paint left, I decided to try the satin silver that I used for the interior. The result wasn't much to my liking. However, the satin silver made for an acceptable base coat and gloss black was applied once more the next day. As an actual working railroad switch lamp, it doesn't have to look absolutely perfect. |


| The lantern functions perfectly. Here the lamp is powered by its 12 volt battery power source. Now ready for the utlimate test on a real working railroad. |
| Now reassembled. The original Corning glass lenses were replaced with brand new old stock Kopp glass lenses courtesy of Richard Samuel's collection. Brass rings are the only other new parts other than the light bulb and lens gaskets. Gaskets and rings were obtained from JerrysRRStuff.com. |


